Translate

Thursday, April 28, 2011

You know you like to sew when...

Hello everyone,

I saw this on an adorable blog today Meg Made This that I had to share it with all my seamstresses out there.

You know you like to sew when...
  • You'd rather resew a button on your new store-bought pants than put on a belt.
  • When you prick you finger, you're more worried about getting blood on the garment than the hole in your hand. (And here's a tip in case that happens.)
  • You spend more on fabric than you do on groceries each month, and you would rather sew clothes than make dinner (see... I'm only halfway domestic).
  • You don't have a desk or a library, but you do have a sewing table and a fabric stash.
  • When your friend asks you to take that bothersome tag off her shirt, you bust out the seam ripper.
  • Instead of socks and Christmas sweaters, the gifts you've received for the last three birthdays, holidays and special occasions have been unassembled clothing (i.e. fabric and notions).
  • When you are planning a vacation, you start thinking of what you need to make not what you need to pack.
  • Your friends and coworkers ask you so often if you made what you are wearing that sometimes, when you didn't, you lie and say yes anyway.
  • When you go to the doctor, for once you are glad that you are getting pricked with a needle on purpose.
  • When you go shopping, you spend more time and energy taking pictures of inspiration than you do actually purchasing anything (and it has to be something that you couldn't "easily make myself anyway.")
Have a wonderful day!!


BTW...I am 99% done with both my jacket and wool coat. I promise to post pictures soon.

Friday, April 22, 2011

Happy Earth Day!!


From: Wikipedia, the free encyclopedia


“Earth Day is a day designed to inspire awareness and appreciation for the Earth's environment. It is on 22 April. It was founded by U.S. Senator Gaylord Nelson (D-Wisconsin) as an environmental teach-in in 1970 and is celebrated in many countries every year. The first Earth Day was in 1970.” 

Earth Day, like other holidays, should remind us to revisit the purpose of the holiday in the first place. Obviously, we really need reminding that we have to change how we think about our planet.


Friday, April 8, 2011

A Gift for a Special Person

Hello Everyone,


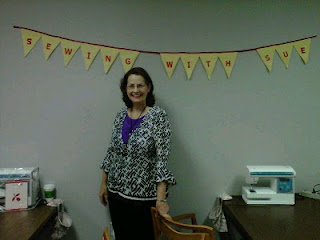
I made a "Thank You" gift for my sewing instructor Sue for all of the guidance, instruction, patience and friendship she has given me over the past year. Sue is such a wonderful woman and I have learned so much from her.

Here is a basic tutorial of how I put this together:

  1. I cut out 26 flag pieces 7 1/2" x 9 1/4". The amount of fabric you need will depend on the lettering you use. I chose 2 coordinating colors (and Sue mentioned to me a while back that she liked yellow).
  2. To make the letters, I chose the size (to fit the flag accordingly) 2" and font and printed it out. I then traced the letters on the paper side of paper-backed webbing. Make sure the right sides of the letter faces down on the paper side.
  3. To fuse, place the nubby side of the webbing on the wrong side of the fabric or paper side up.
  4. Fuse with the iron, cut out the letters. Remove the paper-backing and center them right side up and fuse.
  5. I appliqued the letters on with a zig zag satin stitch and sewed around the edges of each letter. To do a satin stitch set your width to about 3mm and the length to 5mm. This will make the stitch look as solid. Since this was my first time doing applique, going around curves was a challenge (I guess I will have to make more of these to get them just right LOL).
  6. I placed 2 triangles Right sides together and pin. I stitched with coordinating thread along the long edges of triangle, using 1/4" seam allowance. Trim the seam allowance at the point to 1/8". Turn the flag Right, sides out, using a point turner (I used a chopstick to make my corners pointy). You can also do a satin stitch along the edges, Wrong sides together, instead of turning them out.
  7. Fold the flag's top edges in by 1/4". Press and topstitch.
  8. One all the triangles are assembled, arrange each triangle-letter so that the top edge of each triangle overlaps the next by a scant 1". Sew across this area to secure.
  9. Center the entire banner on ribbon, cord or bias tape. I chose single fold bias tape about 4 yards long. Make sure to leave spaces between words (or add an additional blank flag) and leave extra on the sides to either tie a bow or fold over a 1/4" and stitch closed.
  10. Have fun and enjoy your new beautiful banner.
Here are some other close-ups of the banner:


**Quick update - I am almost done with my quilted jacket. I just have to hem it. The wool coat will also be done this weekend and I will post pictures.

Have a wonderful day and weekend!!

Daisypath Anniversary tickers

Daisypath - Personal pictureDaisypath Anniversary tickers